No.1 Pocket Kodak Review & Guide

A classic car made for an ideal subject for the first roll of film I shot with this camera. Scroll down to the bottom if you want to jump straight to the other photos I took. 1/50s 111mm F16 Focus set at 3m Ilford HP5+.
Introduction & Overview
My journey with film seems to be taking me further backwards in time. I started out with the very modern Nikon F100, before moving onto the very analogue Bronica SQ-A. Now I’ve been given a No.1 Pocket Kodak camera, the first bellows camera I have owned and used. Released in 1926 and made until 1931, I believe my camera is one of the later ones produced from 1929 as it comes with the 111mm F7.9 fixed lens, rather strange figures when compared to modern cameras. Conveniently it takes 120 roll film which is still widely available today. Many other cameras of this era use more obscure formats that no longer exist.

The No.1 Pocket Kodak.

The second tripod socket makes it easy to shoot the camera in landscape.

The name plate can be seen below the lens.
Cheap and plentiful, as many have survived as shelf ornaments, the one that came to me was in excellent condition for its age but hadn’t been used in more than two decades. Now I am developing my own film I wanted to test it out and see if it still worked and what I could achieve with it.

The front of the camera when folded. The big silver latch on the right is where you open the camera up to insert the film. Unfortunately as you can see my kick stand is missing.

The back of the camera, the stamp in the middle tells you it takes 120 roll film.
The camera is amazingly compact considering it shoots massive 6x9cm negatives (though you’d still need rather large pockets for it to fit). That’s the beauty of these old bellows cameras, whilst the were a bit more of a hassle to use when compared to a TLR camera, they introduced a level of portability that just wasn’t possible before. Photography was now something that ordinary people could participate in and be able to get good results with a range of options that allowed a minimal capturing of moving subjects. Though to make it clear this particular model is far from the earliest of its kind.

The bottom of the camera with the offset tripod mounting point.

The top with the winder.
Shooting 6x9 means that you get eight images on a roll of 120, which isn’t very much but the large sizes of the negatives gave period photographers a good level of detail that easily held up to contact printing which was widely popular at the time. These cameras were also designed to use Kodak’s special autographic film which allowed you to pull a slot down on the back of the camera to write information on the space in-between frames, whether that was your settings or simply a date. Sadly, there is no way I can try this feature out as the film hasn’t been made in ninety years. It’s little more than throwback to another time.
All the cameras came originally with a small kickstand but sadly the one on my camera has since been broken off and lost.

The camera has a convenient robust handle for carrying around.

The slot originally used to write on autographic film.

My camera still has its stylus for writing on autographic film which is a rarity.
Setting up to Shoot
Inserting film into the camera was a slightly daunting proposal as it wasn’t immediate obvious what to do and as the camera hadn’t been used in such a long time, many of the moving parts were very stiff. To begin with slide the big silver latch up and gently pull up from that side to remove the bellows and lens element of the camera. This opening it where the film goes into. Simply take your film, insert the end into the empty spool, pull up the winder and insert the empty spool with the leader and then wind the film on a turn to pull it tight and push the unexposed roll of film into the other side the camera. The black side of the backing paper will then be taught and facing up. Put the bellows and lens element back in and close up the latch.

The bellows and lens elements needs to be removed to insert a roll of film.

Spool up the new roll as you would normally.

Once it is locked into the winder stretch it out and push the unexposed roll to the other side before re-inserting the bellows.
Now, if you’ve never developed your own film before, then you are probably unaware that there are spacing numbers on the back of the backing paper to use in old cameras such as these. Simply wind on until you see 1 in the orange window in the back of the camera and then manually wind onto the next number each time you take a photo. Bear in mind that there’s no frame lock like on a more modern camera so don’t wind on too far by mistake.

The corresponding frame numbers on the back of the backing paper. Top if for 6x4.5 cameras that shoot 16 frames per roll, the middle is for 6x6 cameras which shoot 12 frames per roll and the bottom one is what we use for this camera (6x9), giving 8 frames.

Simply keep winding on until you see the number 1 in the orange window in the back of the camera. You then simply wind onto the next number once you have taken your shot.
Now ready to shoot, unclip the front and pull gently on the metal knob to pull out the bellows until you hear a click. You can now shoot handheld or, as I do, mount it to a tripod. Holding the camera in your hand you will quickly notice it was two tripod mounting screws. One on the underneath and one on the front on the plate that folds out when you pull out the bellows. This is really handy as it means there’s no need for an L bracket as you would on a camera today.

The front of the lens with the controls for shutter speed and aperture.
The aperture can be changed by pushing the bottom marker from F7.9 all the way to F45. To get the best results you need to shoot either at F22, F32 or F45. Even at F16 you won’t get edge to edge sharpness. Shutter options are very limited, you have 1/50s, 1/25s, Bulb (B) and Time (T). Again, move the (top) marker to switch between modes. As the shutter is operated by a simple spring, I’ve found the timings to be accurate but when it is set to 1/50s it does sometimes get stuck and fire incorrectly. The shutter is actuated by the silver lever but there is an insert point for a universal shutter release which I highly recommend using to reduce the chance of shake.

Due to the overhang of the camera in portrait mode I had to mount the camera to the plate backwards on my tripod. This is not an issue when shooting in landscape.
Framing up is done by looking through the waist level viewfinder which can be rotated for portrait or landscape shooting. It takes a bit of getting used to and I’ve found that what I see in the viewfinder is not 100% accurate to what the camera sees. What probably doesn’t help is that I am missing the lens on the front of my viewfinder, but I don’t know how much difference it makes. In my experience shooting this camera I find what the camera sees is more bottom biased in portrait mode and left biased in landscape mode compared to what I see. I’ve certainly improved but I still don’t get it right 100% of the time.

The viewfinder in portrait mode as it comes out when unfolding.

However it can be pushed around to be easily used when shooting landscape. I didn’t know this when I started so for the first couple of rolls I was awkwardly looking at the viewfinder from the side with the image upside down. Don’t make the same mistake I did!

What you see through the viewfinder. The cross pattern means you understand what is in frame whether you are shooting portrait or landscape.
Now focusing is something you have to be much more mindful of as you have to essential estimate rather than know if you are actually in focus. By turning the worm screw on the right side (portrait) you can extend or retract the bellows to the correct point based on the distance plate on the left side. Infinity focus is 30m or beyond and the camera can focus down to 2m. However, I believe the camera can focus closer than this but as it quite literally goes off the scale it’s hard to put an accurate measurement on what the true minimum focusing distance is.
Once you’ve thought it all out and taken the shot, don’t forget to wind it on to the next frame!

The worm screw used for focusing.

Line up the focus with the distance plate before shooting.

The camera handily uses a universal shutter release which I highly recommend.
The First Five Rolls
So how did I get on with my first five rolls? It certainly was a steep learning curve. On the very first roll I really had no idea what I was doing so none of the images were straight even if I did get the framing roughly correct. I was also unsure as to how much would be in focus depending on certain apertures. The first four rolls being ISO 400 HP5+ (certainly a lot faster than what was available in period) I could easily shoot every image at 1/50s even when stopping down to F22.

One of my first images with the framing both off and the lines not straight. The focus is also soft as I was at infinity when I shouldn’t have been. On the first few images I kept forgetting to adjust focus. 1/50s 111mm F22 Focus set at infinity (30m) Ilford HP5+.

Still tilting! 1/50s 111mm F22 Focus set at infinity (30m) Ilford HP5+.
The accidental Dutch angles worked well for shooting this Humber Super Snipe. Shame about the modern cars behind it. 1/50s 111mm F16 Focus set at 3m Ilford HP5+.
On the second roll I managed to play around with the focus more and get my lines straight to capture a couple of sharp well composed images. Sometimes you had to take a step back and look at what angle the camera was at and not just what you could see in the viewfinder. A problem persisted however from the first roll in the form of inconsistent light leaks on the bottom or left-hand side of images. One thing I learned was to retract the bellows each time before I wound onto the next frame, as you can see with the picture of the cow by not doing so you got a light leak across the entire frame. However, doing this didn’t solve it completely. Based on advice from someone else, I worked it out as light leaking from the pull-down slot for the autographic film. By taping this over it cured the problem, but I didn’t so this until the fifth roll.

On the second roll I achieved getting straight lines with the camera as well as focusing more accurately. 1s (B) 111mm F22 Focus set at 5m Ilford HP5+.

Another image with straight lines. 1s (B) 111mm F22 Focus set at 3m Ilford HP5+.
The third roll overall was a bit of a disaster, nothing was really in focus and the framing was still quite off at times. What I realised is that it was better to focus on the foreground and set a small aperture to achieve back to front sharpness. Focusing on the main subject further back just resulted in a lot of the frame being out of focus. When I put that lesson learned into roll four, along with using a remote shutter release, I got sharp images, edge to edge, for the first time and to my great relief.

Notice the light leak on the left hand side. This is from winding on without retracting the bellows. I focused too far away which meant most of the image is soft. 1/50s 111mm F16 Focus set at ~12m Ilford HP5+.

I got the focus right but unfortunately despite shooting at 1/50s there was still a small amount of shutter shake. 1/50s 111mm F22 Focus set at 3m Ilford HP5+.

Back to front sharpness with F45 but the light leak on the left hand side is very intrusive. 1/2s (B) 111mm F45 Focus set at 5m Ilford HP5+.

Shooting at 1/50s you can just about capture a slow moving subject but the slight motion blur helps with the retro feeling. 1/50s 111mm F22 Focus set at 8m Ilford HP5+.

Before I shot roll number five I taped up the back which fixed my light leak issues.
Finally on roll five with the light leak fixed and a better idea on both composing and activating the shutter, I was able to finally, intentionally, capture decent images. It helped I used the slower FP4+ which allowed me to take longer exposures with B mode where I could either correctly count the time required or just simply avoid the issue of the shutter sticking at 1/50s or 1/25s by quickly pressing it for 1/2s or 1/4s exposures. Thankfully black and white film has a lot of tolerance for being overexposed a stop if I got it wrong.
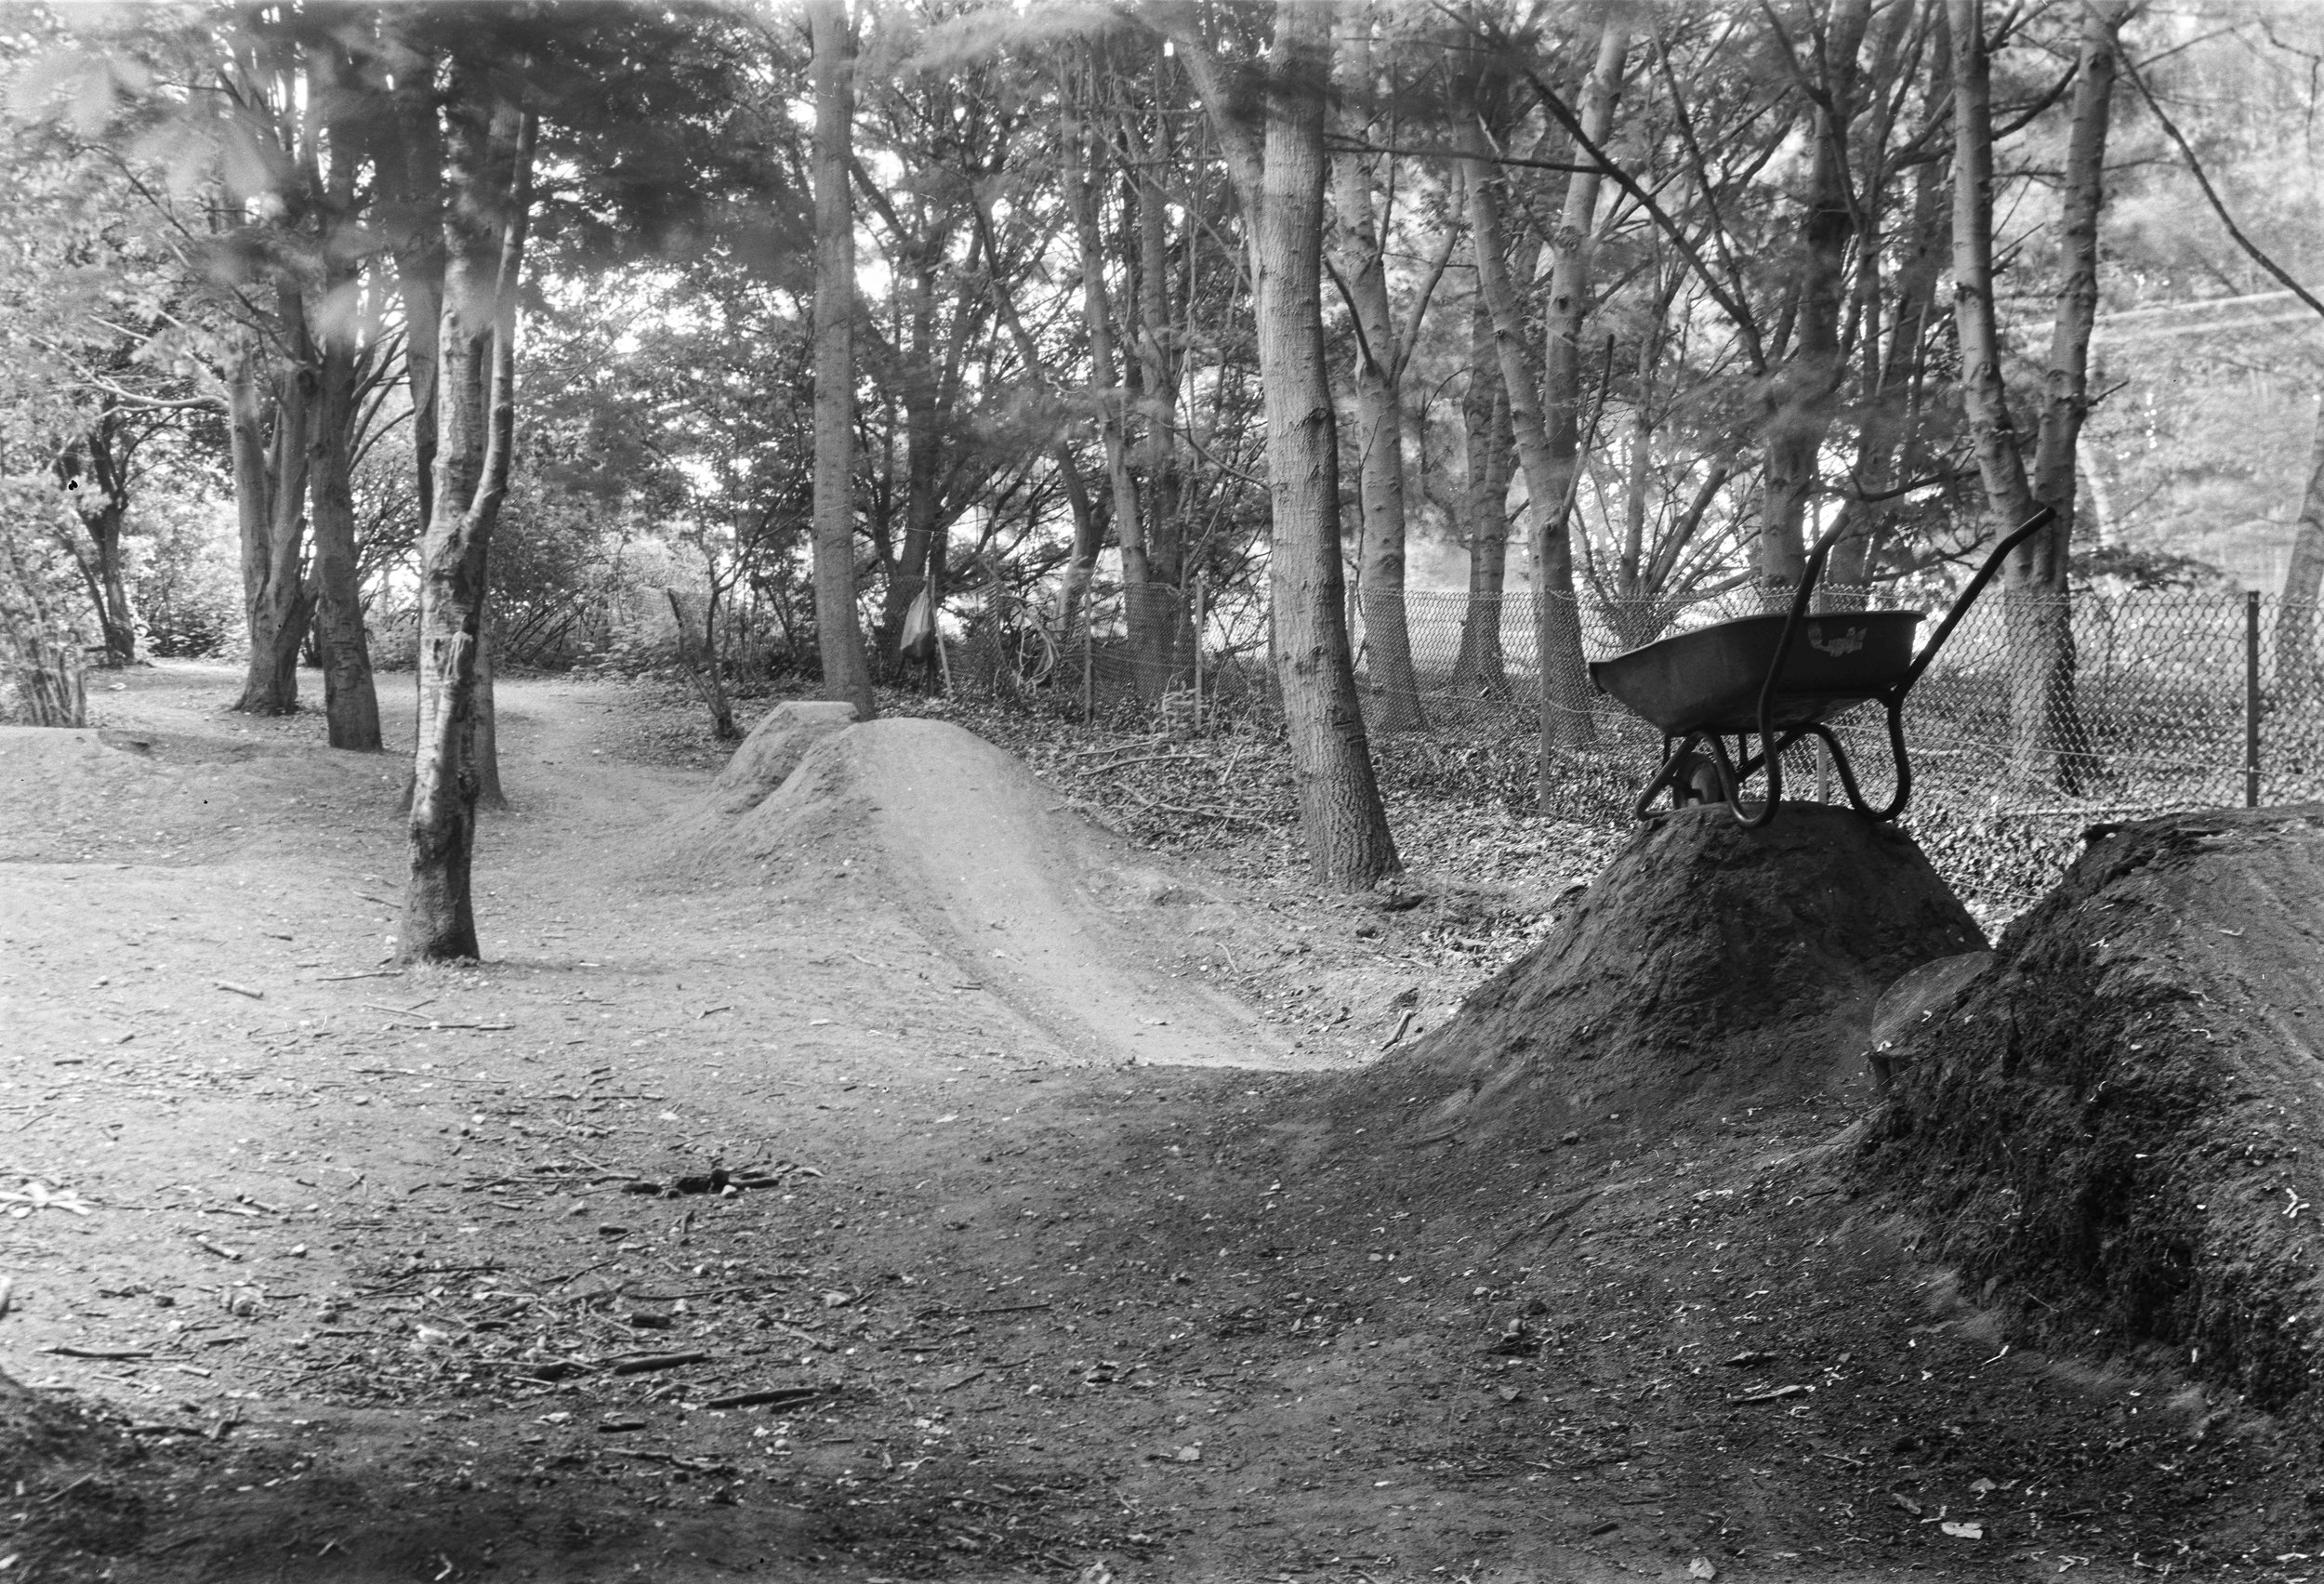
With the wheelbarrow nearby I couldn’t resist setting up this shot at the BMX dirt ramps. Notice the light leak is no longer present. 10s (B) 111mm F22 Focus set at 5m Ilford FP4+.

With F32 there is a great level of sharpness for everywhere except the very front of the image, I could have mitigated this by focusing a bit closer. 1s (B) 111mm F32 Focus set at 5m Ilford FP4+.

Thankfully the sleeping pigs at this pigsty were very still to still be sharp with a 1s exposure. 1s (B) 111mm F45 Focus set at 3m Ilford FP4+.
Conclusion
It certainly wasn’t easy, but it does make you appreciate how much more thought was required in the early days of photography and how advanced even a camera like my forty-year-old Bronica SQ-A really is. I won’t lie, some of my early results were very disheartening and I wasn’t sure whether I’d really be able to do much with this camera, but with a bit more trial and error and finally worked out how to get the most of what was available, and I am now excited to use it every time I take it out. It certainly produces images that have a very retro feel to them, markedly different to my Nikon F100 or Bronica SQ-A, with glass from decades later.

The old building of the British Schools Museum made an ideal subject, just a shame about the modern lamppost. 1/4s (B) 111mm F45 Focus set at 5m Ilford FP4+.
Being so cheap (you can buy one for as little as £30) I definitely recommend to those who are interested to pick up one of these cameras and just give it a go. There’s just something special about creating images with such primitive technology, especially when you develop the film yourself. When you take a really good image, you’ll simply appreciate it so much more.

Hitchin Market, the slow shutter speed has produced a few ghostly people. 1/4s (B) 111mm F45 Focus set at 5m Ilford FP4+.
With its compact size it also makes it ideal as an extra camera to take with me whilst travelling with other film gear or even my digital cameras. I’ve certainly got plans for it which you will see in upcoming blogs. What do you think? Will you give one of these old bellows cameras a go if you haven’t already? Let me know your experiences in the comments section down below.
If you enjoyed this blog then please consider leaving a tip below.